Flickr get all image sizes bookmarklet

This is a bookmarklet that gives one-click access to all the Flickr image sizes on the new Flickr site. To use, click the bookmarklet when viewing an image. To install, copy the code, make a new bookmark, edit it, and paste the code into the bookmark’s address field. This has been tested on Chrome, Firefox, and Safari:

javascript: (function () {
        var url = document.URL;
        if (url.indexOf('flickr.com') >= 0) {
          try {
            pos = url.indexOf('/in/');
            if (pos > 0) {
                url = url.substring(0, pos);
            }
            newUrl = url + '/sizes/m/in/photostream/';
            window.location = newUrl;
          }
          catch(error) {
            alert('Sorry, it didn\'t work!\nYou must be on a page of a single image.');
          }
        }
        else {
          alert('You are not on flickr.com!');
        }
 }());

Building an Orone Mini part 2: solder paste stencils using gerber2graphtec

This is part of a series of posts about building an Orone Mini, a Maple Mini clone that is designed to be easier to build by hobbyists. It primarily uses surface mount technology, and there are a couple of fine-pitch (0.5mm) devices, so it’s not easy to solder by hand. This means I need to use a solder stencil.

I want to make my own stencils, since I want faster turnaround time. But how to do it? Adafruit has a great tutorial on making SMT stencils, but the final output step uses a laser cutter. I don’t want to buy a laser cutter, since they’re in the thousands of dollars – making my own laser stencil cutter is cool, but right now I don’t have the time for it. Making aluminum stencils also sounds cool but I don’t want to mess around with muriatic acid and other chemicals each time I want to make one.

On Hack A Day I heard about using a vinyl cutter to cut stencils which linked to Peter Monta’s wonderful program gerber2graphtec.

This is a command line program that takes gerber files output by an EDA program (in my case, Eagle) and turns them into something that the inexpensive Silhoutte Cameo stencil cutter can understand. You can get more info on Peter Monta’s SMT Stencil Cutting blog post, or this one at DM Studios on stencil cutting.

Here’s what worked for me:

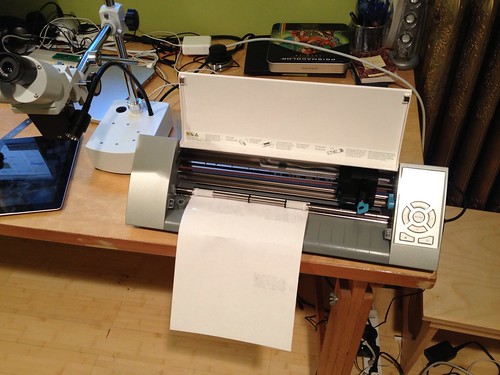
  1. Graphtec Silhouette Cameo stencil cutter bundle – $270 as of the writing of this blog post, much less expensive than a laser cutter.
  2. 3M PP2500 overhead transparency film
  3. Avery 5353 full-sheet labels
  4. Citrasolv citrus solvent
  5. Dental pick
  6. Wide-field microscope (about $180; I also use it for SMT joint inspection) or magnifying glass

This is pretty much exactly as Peter Monta explains in his SMT stencil cutting blog post. I tried some of the other ways he thought might work – using the cutting mat instead of the full sheet label, or using spray-on removable adhesive. But these weren’t as successful – I think the Avery labels stick well and keep the plastic film from bending while the cutting is going on.

I’m on Mac OS X using Homebrew (rather than the MacPorts that Monta uses). Here’s the steps I went through.:

  1. Install the non-Python dependencies for gerber2graphtec:
    $ brew update
    $ brew install gerbv pstoedit libusb
    
  2. Make a Python virtual environment to hold the Python dependencies
  3. If you don’t have Python and pip, install them. (Using brew to install Python installs pip.)
    $ brew install python
    
  4. Install virtualenvwrapper and make a Python virtualenv to keep the Python dependencies separate from your global libraries (this step is optional):
    $ pip install virtualenvwrapper
    $ mkvirtualenv eda
    
  5. Install the Python dependencies:
    $ pip install libusb1
    
  6. Clone the gerber2graphtec project
    $ git clone https://github.com/pmonta/gerber2graphtec.git
    $ cd gerber2graphtec
    
  7. Use an EDA tools to produce the solder stencil layer (tcream layer in Eagle) gerber files as in the Adafruit SMT stencil tutorial. I use a 1-mil shrink – that is, I shrink all the pads by 1 mil so the solder paste doesn’t overflow too much. This is a compromise – I’d really like to shrink by 3 or 4 mils, but the stencil cutter doesn’t produce perfect holes if I shrink the fine-pitch pads that much, and the solder paste I’m using (lead-free Kester NXP) doesn’t go through the small holes that well. 1-mil shrink seems to work fine.
  8. Check the gerber2graphtec options to get ready to convert your gerber to something the Cameo will understand:

    $ ./gerber2graphtec
    usage: gerber2graphtec [options] paste.gbr >/dev/usb/lp0
    
    options:
      --offset x,y        translate to device coordinates x,y (inches)
      --border bx,by      leave a border around the bounding box of the gerber file
      --matrix a,b,c,d    transform coordinates by [a b;c d]
      --speed s[,s2[,s3]] use speed s in device units; s2,s3 for multiple passes
      --force f[,f2[,f3]] use force f in device units; f2,f3 for multiple passes
      --cut_mode [0|1]    0 for highest accuracy (fine pitch), 1 for highest speed
    
    defaults:
      --offset 4.0,0.5  suitable for letter size (portrait) on the Cameo, fed as "media" not "mat"
      --border 1,1      1-inch border in x and y around gerber bounding box
      --matrix 1,0,0,1  identity linear transform for scale and skew calibration
      --speed 2,2       use two passes, speed 2 in each pass
      --force 8,30      use force 8 for first pass, force 30 for second pass
      --cut_mode 0      highest accuracy
    
  9. Process the tcream gerber file to make a file that can be sent to the Silhouette Cameo (.gtec file). These settings are for a 0.5 inch bounding box around the board outline; gerber2graphtec calculates the border from the bounding box of the stencil, which may not be the edge of the board. I’m adding an offset so the stencil is cut into the right edge of the sheet.
    $ gerber2graphtec --speed 1,1,1 --force 8,15,29 --cut_mode 0 --offset 0.5,5.5 --border 0.645,0.6667 Orone-mini-S8H-v0r001.tcream.ger > Orone-mini-S8H-v0r001.tcream.gtec
    

    I’m using 3 passes with increasing force – with three passes I can get almost perfect cut-outs of the fine-pitch pads.

  10. Attach a full sheet label to the transparent overhead film – make sure there are no bubbles and the film is firmly attached
  11. Set the 45 degree cutting blade to setting 1. (With the Avery 5353 labels stuck to the PP2500 film, I found blade length setting 1 perfect using 3 passes, first pass at force 8, second at force 15, third at force 29.)
  12. Load the film+label as media (without the cutting mat)
  13. Send the gtec file to the Cameo cutter:
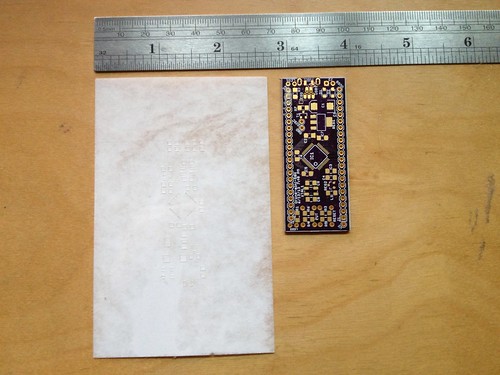
    $ file2graphtec Orone-mini-S8H-v0r001.tcream.gtec
    
  14. Unload the media, peel off the stencil:
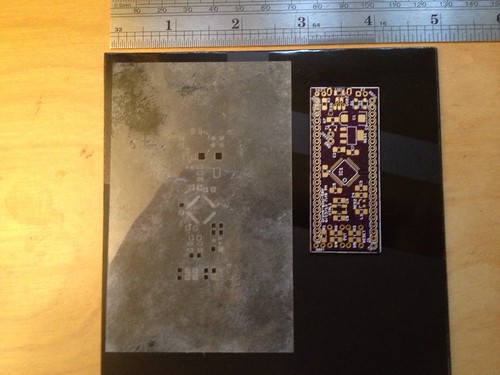
  15. Remove paper from stencil by running under water and rubbing – this picture shows the stencil with the adhesive gunk still on it:
  16. Remove adhesive using Citrasolv and sponge
  17. Rinse with clean water and dry
  18. Examine under microscope or magnifying glass – remove chads that are still stuck using the dental pick

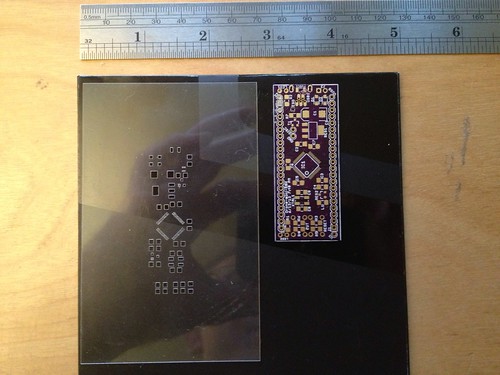
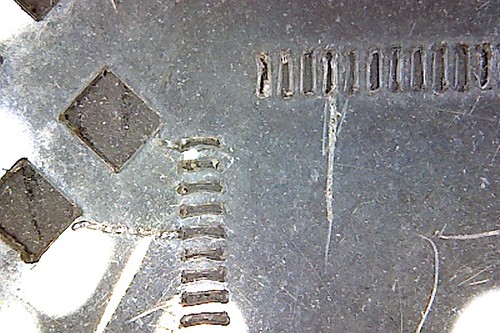
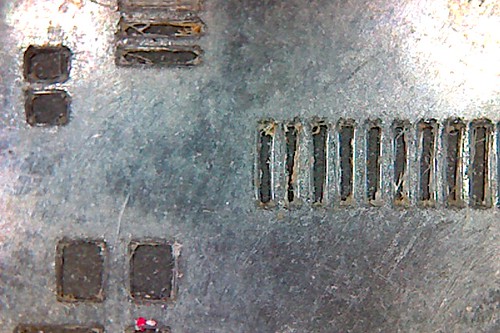
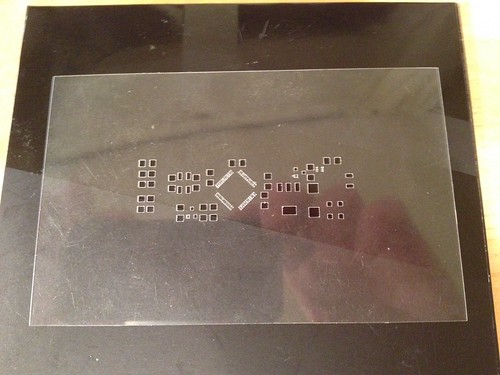
  19. Using the 3-pass progressively harder pressure, on a fresh sheet with no other stencils cut out of it, I can get almost perfectly square holes even on the fine-pitch pads. The picture above shows a 2-pass run I did on sheet that had other stencils cut out of it. I think the fine-pitch TQFP pads are distorted on this one because the Orone Mini has the STM32 fine-pitch TQFP part laid out on a diagonal – when I cut the test coupon that had fine pitch pads layed out straight, the fine-pitch pads came out almost perfectly:

    When I went to the 3-pass using a fresh sheet, my fine-pitch diagonal pads look like this too. Success!

  20. You are done!

(Part 1: Introduction)


Building an Orone Mini: part 1, introduction

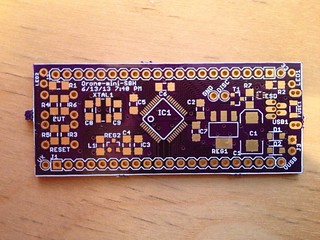
I’m building a Maple Mini clone called the Orone Mini S8H as practice for building an Open Source EEG board. The Orone Mini is a board designed by Garry Bulmer in the UK. It’s software compatible with the Maple Mini but designed to be more easily made at home by hobbyists – it’s a two-layer board, and mainly uses larger 1206 size SMD components, on one side of the board only. Here’s a couple of articles about it: Improving the Maple Mini Part 1, Improving the Maple Mini Part 2. Here’s the Maple Mini specifications.

I got the boards made at the fabulous OSH Park:

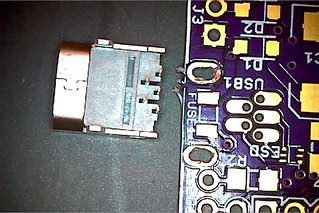
This board uses a different mini-USB connector than the Maple, with a couple of tabs that make the board connection sturdier. I forgot to pick the right connector variant in Eagle when I submitted the board – so instead of slots for the connector’s tabs, there are a couple of plated holes that the connector won’t fit into. I had to get out the Proxon Micromot (Dremel-like tool) to router out two slots:

I’ll post updates on my progress here as I go along – so stay tuned!

(Part 2: solder paste stencils using gerber2graphtec)


WordPress botnet protection for websites on Apache 2

There’s a botnet out there that’s attacking WordPress sites, trying to brute-force guess their admin passwords. I recently got alerted there was a traffic spike on my website, which is unusual. I looked at the server access logs, and indeed, there was something trying to access my WordPress login page over and over. This is output from a tail /var/log/apache2/mysite-access.log:

46.105.113.8 - - [14/Apr/2013:22:57:20 -0400] "POST /blog//wp-login.php HTTP/1.1" 200 4115 "-" "Mozilla/5.0 (X11; U; Linux i686; pt-BR; rv:1.9.0.15) Gecko/20091028
15 Ubuntu/9.04 (jaunty) Firefox/3.0.15"
74.207.229.103 - - [14/Apr/2013:22:57:20 -0400] "POST /wp-cron.php?doing_wp_cron=1365994640.1665890216827392578125 HTTP/1.0" 200 222 "-" "WordPress/3.5.1; http://adamfeuer.com"

So what to do? I looked around for an article on how to protect myself from the botnet, but didn’t find any good ones. So that’s why I’m writing this article.

WordPress security plugins

If you only have one or a few WordPress sites to protect, as the article I link to above mentions, it looks like you can install a plugin to protect you. Both these will automatically block logins from IPs after a certain number of failed login attempts. I haven’t tried either yet.

Apache mod_security

I wanted a solution that would work for all the WordPress sites on my server. That meant something at the Apache configuration level, or in the OS. I’m running Ubuntu 12.04. Here’s what I did, and it seems to work – this solution will block all attempts to log into WordPress except from a whitelisted IP address.

  1. Install Apache mod_securitymod_security is an Apache module that helps prevent attacks like this, and does a lot of other cool security stuff.
  2. Make sure you follow the instructions in the article above to install the default rule set
  3. Find out your IP address of your home network – one way is to type “What is my IP address” into Google.
  4. Add the following rules into your /etc/modsecurity/modsecurity.conf file:
    # site configuration
    # allow all access from home
    SecRule REMOTE_ADDR "^1.2.3.4" phase:1,nolog,allow,ctl:ruleEngine=off
    # deny all access to wp-login or wp-cron - to prevent wordpress botnet attacks
    SecRule REQUEST_URI "@rx (.*)wp-login.php(.*)" deny,nolog
    

    Replace the 1.2.3.4 with your home IP address. You can have multiple lines like this if you access your WordPress site from multiple IP addresses.

  5. Restart Apache:
    $ sudo /etc/init.d/apache2 restart
    
  6. You are done. If you want, you can check your Apache logs to see there’s now 403 error codes being returned for the botnet requests.

The solution isn’t perfect, since you still get lots of “403 – Forbidden” log entries, but it’s better than leaving your WordPress site vulnerable.

Update: after I whitelisted my home IP, the botnet seems to have given up – after about 15 minutes the requests stopped coming.

Update: I posted the question and answer to Stack Overflow, since that will probably get more traffic than this blog post: How do I protect my WordPress/Apache website from a brute-force botnet attack?


Amazon Library Linky – search any Bibliocommons library while viewing Amazon product pages

You can install the Amazon Library Linky Chrome extension from the Chrome Store.

I ported the Amazon SPL Linky Greasemonkey script to Chrome and made it a proper Chrome Extension. This extension can search any Bibliocommons library, and has an options page where you can select which library you want to search. All of the participating Bibliocommons libraries are supported (about 50).

[Update:] You can see the source code here: Amazon Library Linky on Github.

If you try it out, will you let me know how it works for you?

The following Bibliocommons libraries are supported:

Austin Public Library
Barrie Public Library
Boston Public Library
Burlington Public Library
Brantford Public Library
Burnaby Public Library
Cooperative Computer Services
Chinook Arch Regional Library System
Christchurch City Libraries
CLEVNET Library Cooperation
Daniel Boone Regional Library
Edmonton Public Library
Fort Saskatchewan Public Library
Fraser Valley Regional Library
Greater Victoria Public Library
Halton Hills Public Library
Hamilton Public Library
Johnson County Library
Markham Public Library
Milton Public Library
Multnomah County Library
New Westminster Public Library
North Vancouver District Public Library
New York Public Library
Oceanside Public Library
Omaha Public Library
Oakville Public Library
Orangeville Public Library
Ottawa Public Library
Perth East Public Library
Pickering Public Library
Princeton Public Library
Red Deer Public Library
The Richmond Hill Public Library
Santa Clara County Library
Strathcona County Library
The Seattle Public Library
Shortgrass Library System
Salt Lake City Public Library System
Santa Monica Public Library
Stratford Public Library
St. Albert Public Library
St. Marys Public Library
Tulsa City-County Library
Vancouver Island Regional Library
New Brunswick Public Library Service
Vancouver Public Library
Whatcom County Library System
Whitby Public Library
Windsor Public Library
Woodstock Public Library
West Perth Public Library
Yarra Plenty Regional Library


Chrome Extension: Making Browser Action icon open options page

Here’s how to make it so clicking the Page Action icon of a Chrome extension opens the extension options page. This code will open a new options page if one is not open, or switch to it if it’s already option.

You will need the “tabs” permission in your manifest.json:


   "permissions": [
      "tabs",
    ],
   "background": {
     "scripts": ["background.js"],
     "persistent": false
   }

Put this code in your background.js file:


function openOrFocusOptionsPage() {
   var optionsUrl = chrome.extension.getURL('options.html'); 
   chrome.tabs.query({}, function(extensionTabs) {
      var found = false;
      for (var i=0; i < extensionTabs.length; i++) {
         if (optionsUrl == extensionTabs[i].url) {
            found = true;
            console.log("tab id: " + extensionTabs[i].id);
            chrome.tabs.update(extensionTabs[i].id, {"selected": true});
         }
      }
      if (found == false) {
          chrome.tabs.create({url: "options.html"});
      }
   });
}
chrome.extension.onConnect.addListener(function(port) {
  var tab = port.sender.tab;
  // This will get called by the content script we execute in
  // the tab as a result of the user pressing the browser action.
  port.onMessage.addListener(function(info) {
    var max_length = 1024;
    if (info.selection.length > max_length)
      info.selection = info.selection.substring(0, max_length);
      openOrFocusOptionsPage();
  });
});

// Called when the user clicks on the browser action icon.
chrome.browserAction.onClicked.addListener(function(tab) {
   openOrFocusOptionsPage();
});


Finding the durations of MP4 files without downloading the entire file

I wanted to find the durations of a bunch of MP4 files located out on the net – durations for the introduction videos for the top Kickstarter projects.

But I wanted to do this quickly. Downloading all those MP4 files would take too long. A little bit of research revealed that MP4 files files set up for streaming have their metadata (or moov atom) at the beginning of the file.

Now I need a way to read just the metadata, without getting the entire file.

More research reveals that I can use curl and dd to get the first bytes of a file. For some reason ‘curl -r’ doesn’t work.

So now we’re ready to go.

I made a file that had one Kickstarter project URL per line. Here’s a couple of them:

http://www.kickstarter.com/projects/formlabs/form-1-an-affordable-professional-3d-printer
http://www.kickstarter.com/projects/1523379957/oculus-rift-step-into-the-game

This script will load the Kickstarter project page, and get the URL-encoded download link for the project’s introductory video, if there is one:

$ cat ks-urls | xargs -Ifoo sh -c "curl -s foo|grep link |grep http://www.kickstarter.com/swf/kickplayer.swf |cut -d '&' -f 5| sed -e 's/amp;file=//g' " > ks-video-urls

Now we need to URL-decode the URLs:

$ cat ks-video-urls | python -c 'import sys, urllib; print urllib.unquote_plus(sys.stdin.read())' > ks-decoded-video-urls

Now we get the durations from the video urls, you’ll need Python, pip, and virtualenvwrapper installed. We make a Python virtual environment, and install hsaudiotag module to decode the mp4 metadata:

$ mkvirtualenv mp4
$ pip install hsaudiotag
$ cat ks-decoded-video-urls| xargs -Ifoo sh -c "curl -s foo| dd count=1 2>/dev/null | python -c 'import sys, StringIO; from hsaudiotag import mp4; s=StringIO.StringIO(sys.stdin.read()); print mp4.File(s).duration'" > ks-video-durations

This code uses curl and dd to download only the first 512-byte block of the MP4 file.

Now we analyze the durations using a simple R script, I am on a Mac so I need to use Homebrew to install R:

$ brew install gfortran
$ brew install R
$ R -q -e "x <- read.csv('ks-video-durations', header = F); summary(x); sprintf('standard deviation: %f', sd(x[ , 1]))"

Output for the top 100 Kickstarter technology projects (by amount raised) - all numbers are in seconds:

 Min.   : 52.0  
 1st Qu.:145.8  
 Median :183.5  
 Mean   :203.3  
 3rd Qu.:246.5  
 Max.   :583.0
[1] "standard deviation: 90.14273"

The average duration of the top 100 Kickstarter videos is 203.3 seconds, or just about 3.38 minutes.


Thanks to:

Welcome to my Notes blog!

This blog is a place for things that are off-topic to my main blog, which is on Enlightened Society, Greatness, and Teams. I wanted somewhere to post articles on random things, like software or projects I am working on, recipes, and pictures of cats. :-)